HTML & CSS Basics
For this tutorial, you'll need a text/code editor. A simple text editor like Notepad (Windows) or TextEdit (Mac) suffices. I'll be using Notepad for this tutorial.
This tutorial is intended to just introduce ideas so you become familiar with them. Other classes, like Codecademy, go much deeper, but it's easier when you're familiar with the concepts.
Rectangles, rectangles, rectangles
A webpage is just a big rectangle with smaller rectangles inside. And inside those smaller rectangles are words, images, videos, and many other things.
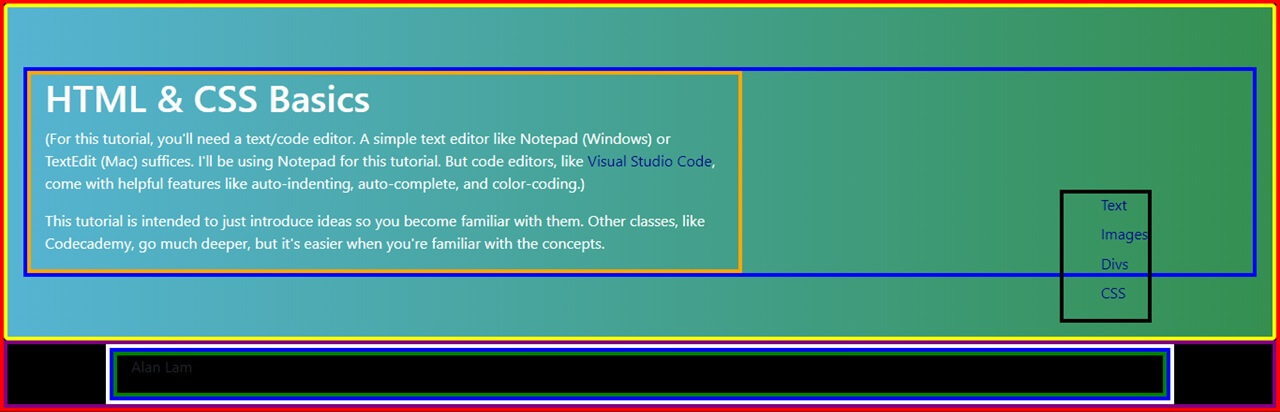
For example, these are some of the rectangles for this webpage. An earlier version anyways.
Rectangles, and the content inside (called elements), are created with code. In particular, HTML, which stands for Hypertext Markup Language.
Before moving on, open your text/code editor, create a new file, and save the file as "index.html" (Without the quotes). Also, make a new folder on your desktop and move the file there.
Text
The two main types of text you're going to see on a website are headings and paragraphs. Headings are the big bold titles and paragraphs are the regular words, like the ones in this sentence.
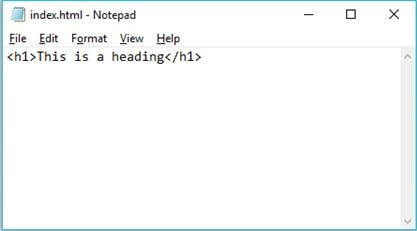
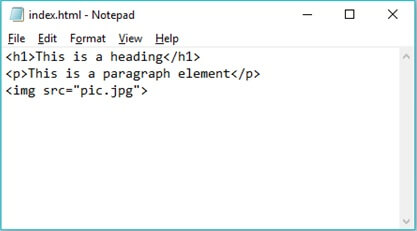
This is the syntax for creating a heading element. The <h1> is called an opening tag. The </h1> is called a closing tag. "h1" means it is a heading with the biggest size. The numbers range from 1-6 where 1 is the largest and 6 is the smallest. These numbers only apply for headings.
Save the file, go to the place where it is saved on your computer, and open* it. You should see the words "This is a heading" at the top left.
*From this point on, when I say open index.html - or if you want to see the changes you made -, I mean refresh the page if you haven't closed the page yet. Also, it is implied that you should save files after making changes to them.
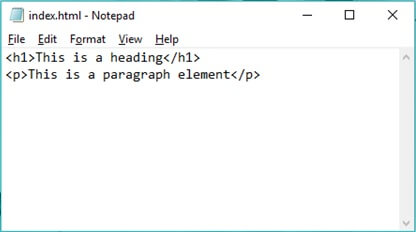
Below the heading is the syntax for a paragraph element. The opening tag (<p>) is at the beginning and the closing tag (</p>) is at the end. As you can guess, the "p" stands for paragraph. If you save your file and open it, you should see the paragraph element below the heading.
Images
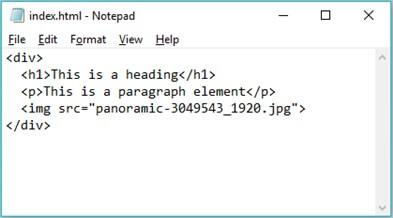
This is the syntax for an image. The src is short for "source", which specifies where the image is located. If the image is online, then the src would be the link to that image. If the image is offline (on your computer), then the src would be the path on your computer to that image.
Here is a sample image you can use to try. There are two ways to go about this. You can put <img src="https://raw.githubusercontent.com/alan-lam/webdevforbeginners.github.io/master/pictures/panoramic-3049543_1920.jpg"> The src is the link to the image because the image is online. On the other hand, if you download it and save it in the same folder as the index.html file, the code for the image would be <img src="panoramic-3049543_1920.jpg"> Here, the image is offline (on your computer) so the src is the path on your computer to the image. Since they are in the same folder, the path is just the name of the image file. If the image isn't in the same folder, then the path would probably be something like "C:\Users\Alan\Pictures\pic.jpg"
I know this path stuff may be confusing. Admittedly, I didn't explain this that well. Here's a tutorial on this specific part so I could go into more detail.
Divs
"Div" is short for "division". In this case, division means a part of the webpage that has been divided. These are the rectangles I mentioned earlier. One way of looking at this is like imagining the webpage as a big rectangle. Adding divs is like adding smaller rectangles inside the big rectangle.
Here is the syntax for creating a div. By convention, everything inside a div is indented by 2 spaces. If you save the file and open it, nothing should change. That is because divs don't add anything visual. They are used - not exclusively - to place elements that should logically be together. For example, the menu on the right on this webpage (if you're viewing on desktop) is inside it's own div because it contains links to places on this page. So it is logical to place them together inside a div. The black footer at the very bottom is in its own div because it is separate from the rest of the elements on this webpage.
Because they are related, you would want related elements to look the same. For example, for this webpage, the instructional text is white and menu links are blue. Putting logically related elements inside a div makes it easy to style them so they look the same.
Classes
Classes are like labels. It can be thought of like an actual class (in college), where a math class has math majors and a history class has history majors. Like in the college class example, elements inside a class are expected to be related to each other in some way. If that sounds familiar, it's because divs have classes. Back to the college class example, putting math students inside a classroom is like putting elements in a div. Putting a label on the door that says "Math Class" is like adding a class to that div.
I think the best way to understand classes is to try using them in an example. So I'd like to introduce an exercise at this point.
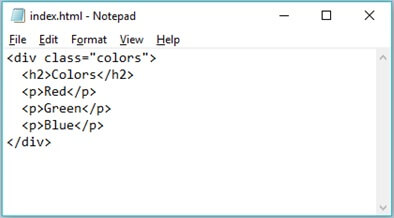
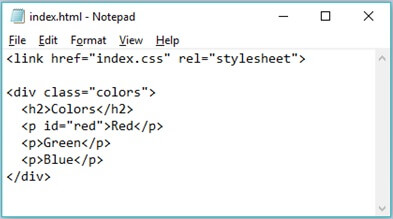
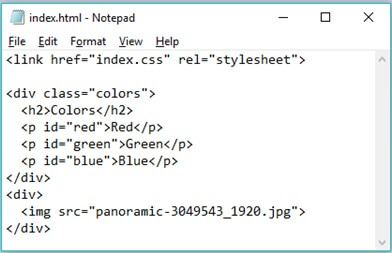
In your index.html file, delete everything and:
- Add a div
- Add a heading (h2) that says "Colors"
- Add three paragraph elements, one for red, blue, and green
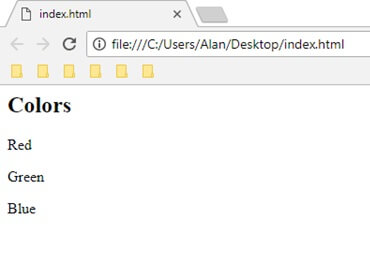
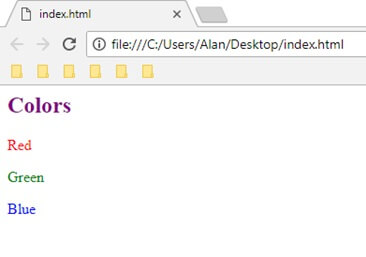
The webpage should look something like this.
Click Here For Answer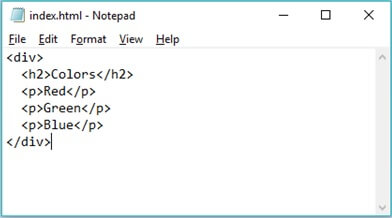
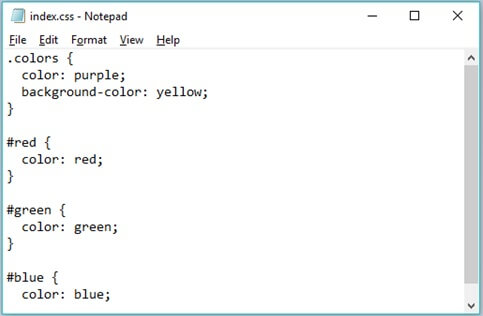
This is the syntax for adding a class to a div. You could name a class anything you want. I chose "colors" because that made sense in this situation. It is a div containing names of colors.
CSS
At the end of the "Divs" section, I mentioned that putting elements in a div makes it easier to style related elements. The first step to achieving that is adding a class in a div. The second step is CSS.
CSS stands for "Cascading Style Sheets". It is a "programming" language used to dictate how elements in a document should look. Color, backgrounds, size, and position are the main properties (that I use a lot anyways) that are determined using CSS.
At this point, open a brand new text file and save it as "index.css" (Without the quotes). And move it to the folder containing index.html.
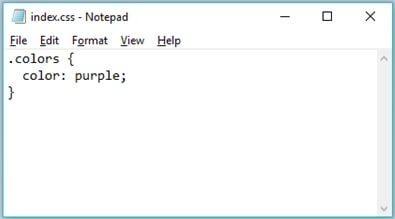
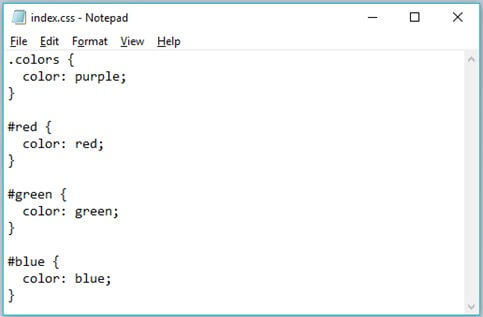
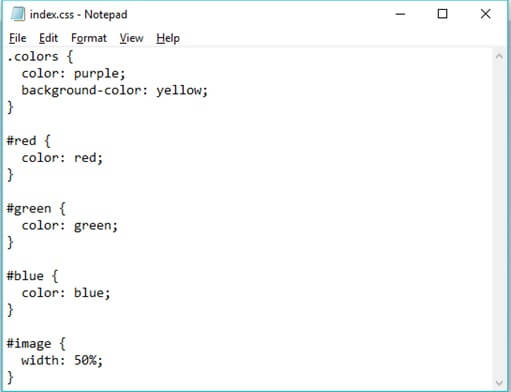
This is the syntax for CSS. If you want to target a class, you put a period in front of the class name. Like in the html file, there's 2 spaces of indentation. Again, it's by convention. Whitespace doesn't actually have an effect on the result; it's there for readability. Also, the rules must end with a semicolon.
By putting color: purple, I'm specifying that elements with the class "colors" should be purple.
Try saving both files (index.html and index.css) and opening index.html.
Nothing should have changed. If you were expecting something to turn purple, then good. But we're not quite there yet. That's because we need to "link" the html and css files.
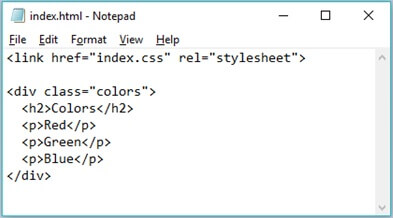
By doing this, index.html knows which file to look at for styling rules. href is similar to src in that it specifies the location of a file. Since index.css and index.html are in the same folder, the location is the name of the file. As mentioned before, the newline/whitespace between the link and div is only there for readability.
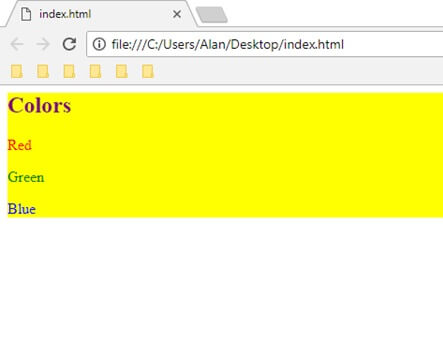
Now try opening index.html again. All the text should be purple. Look at index.html and see if it makes sense why this is happening.
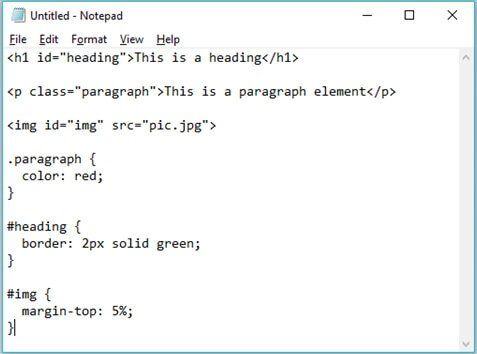
ID's
ID's are like classes. In fact, they can (but probably shouldn't) be used interchangeably. However, it makes more logical sense to give id's to a specific element or group of elements. In the college class example, it would be like giving a name to a specific student.
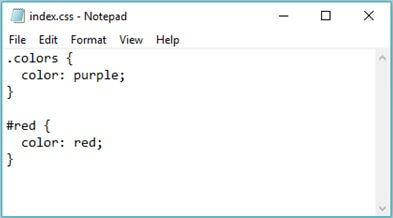
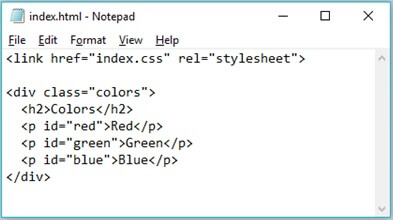
Below the colors class is the syntax for targeting an element with an id. With classes, you target them by putting a period in front of the name. With id's, you target them with a "#".
- Challenge: Try adding the red id to the corresponding element in index.html. Hint: It's similar to the way you add a class.
Save both files and open index.html. Notice how the red paragraph element is red even though it is inside a div with a class called "colors", which we defined to make all elements inside that div purple. This is because ID's supersede classes. It's helpful if you want to target only 1 element without changing the others that are in the same div with a class.
- Try adding id's to the other 2 paragraph elements and the corresponding CSS rules to get this effect:
Click Here For Answer
More CSS
Changing the color of the text made the webpage a little more colorful, but the white background still looks boring. Let's give the colors div a yellow background.
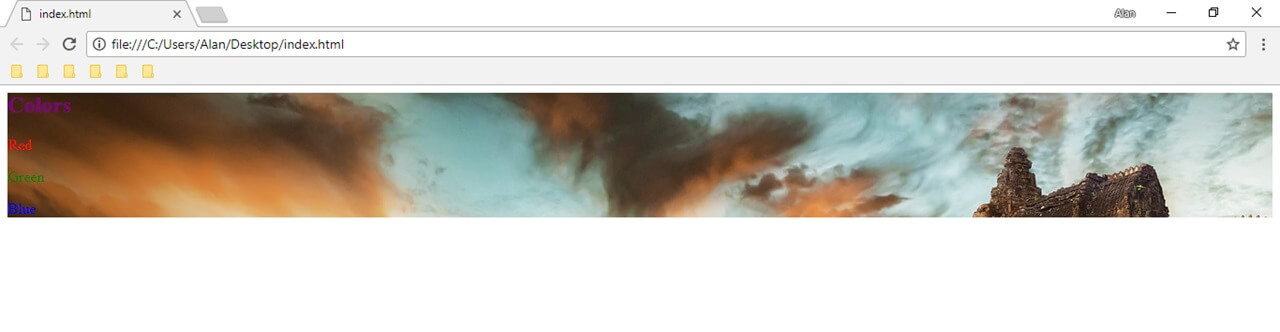
Now there's a lot more color. Maybe it's not prettier but there's a lot more color. Hopefully this provides some insight into the whole rectangles thing I mentioned at the beginning.
Images can be used for backgrounds as well. Here's what that would look like.
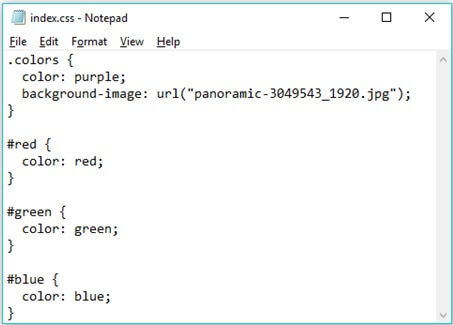
The url can be the link to somewhere online or it could be the path to an image on your computer. The tutorial on paths applies for the latter as well.
Also, if you add more content to expand the div downwards, more of the image will show.
Let's try another exercise to revisit images and introduce another property.
- Add another div below the colors div.
- Add an image element inside the div you just created. (Either with the image I provided earlier or one of your own for a challenge.)
If you used the image I provided earlier, then perhaps it's a little too big. So let's fix it.
- Challenge: Add a CSS rule that changes the image's width. Hints: you need either a class or id (in index.html) and use a percentage (in index.css) to make it bigger or smaller.
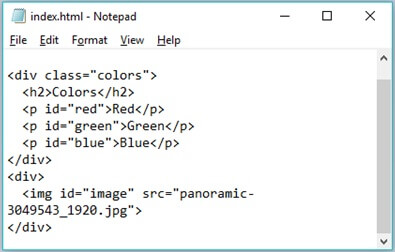
There are many ways to achieve this result. I chose to put an id in the image element, but an id in the div works too. A class (in the div or the image element) is another way to go.
Putting a width of 50% means shrinking the image to half its original width. Putting a width over 100% enlarges it beyond its original width. Any positive percentage can be used. The same can be done for height.
The cover photo at the top also contains two rules that I commonly use.
Links
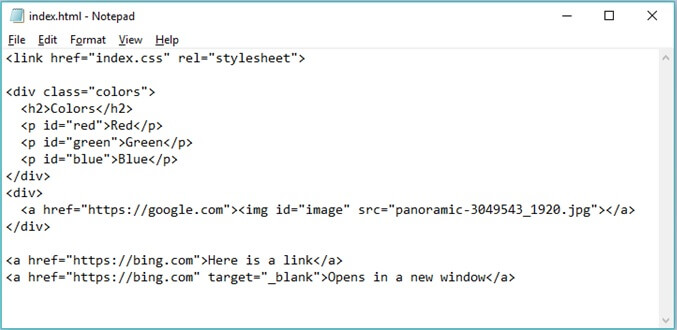
Not the link at the top of the file. That was for linking the html file with the css file. The links I'm referring to are the <a> elements at the bottom of the file in the image.
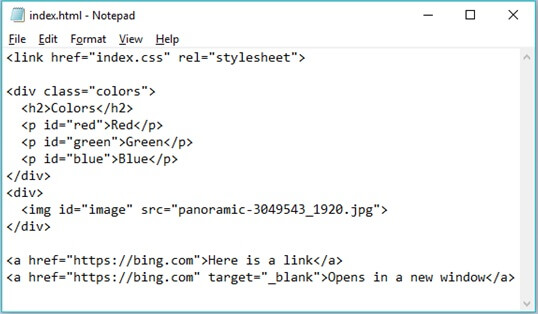
Here are two anchor elements. Informally, I think of them as links. Both are to Bing :) but the first one opens in the same window and the second one opens in another window/tab. As you can probably tell, it's because of the target="_blank", which means open in a new window/tab. Somehow.
Whatever goes between the opening tag and closing tag is going to be hyperlinked. This means that you could put in image element between the tags and that would make the image link to another website.
Here is what that would look like.
Conclusion
You are now familiar with the components of websites. If you want to learn more, like on Codecademy, then I hope reading this first will make learning easier. That was my goal.
Your current index.html doesn't follow website/webpage/HTML standards. So it's kinda really not a website. It's like drawing a few lines on a paper and calling it art (or yourself an artist). Technically, it is art and you are an artist, but there's a lot more to drawing and being an artist than that. Arguably.
Click here to go to the next tutorial where I briefly go over the technical formalities that do make your website follow website/webpage/HTML standards.